Tic-Tac-Toe
For our robot art project my partner Aiden and I built and programmed the game Tic-Tac-Toe. Tic-Tac-Toe is played with four lines in this shape #. There are two players, one player is X's, the other is O,s. Each turn you get to put one of the letters inside of one of the boxes. The goal of the game is to get three of letters going horizontally, diagonally, or vertically. Once you do this, you win the game.
Controls
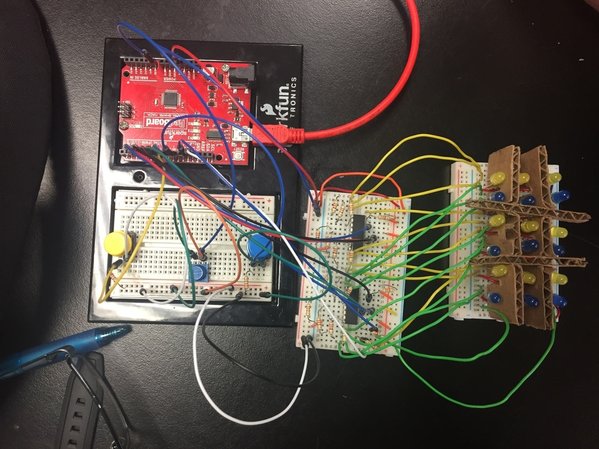
As you can see on the right side of this picture, there are 18 LED/lights used. The yellow lights represent the X's and the blue lights represent the O's. The cardboard is there to represent the Tic-Tac-Toe board. The controls to the game are located on the left side of the picture. There is also a potentiometer (small blue button) located between the larger blue and yellow buttons on the control board.
When you twist the potentiometer, the LEDs light up relative to how far you have rotated the potentiometer. After you have your position, you hit the button corresponding with the light that is lit up to lock your move into place. The game also is smart enough to know it's the other player's turn..
When you twist the potentiometer, the LEDs light up relative to how far you have rotated the potentiometer. After you have your position, you hit the button corresponding with the light that is lit up to lock your move into place. The game also is smart enough to know it's the other player's turn..
Code
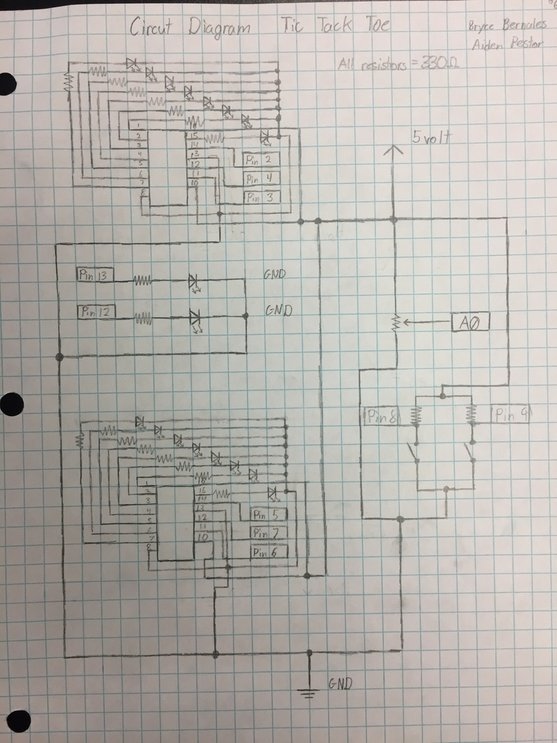
Circuit Diagram
This is a circuit diagram of our project. It shows all the wire connections to certain LEDs, resistors, pins, etc. It also shows the flow of electricity throughout the circuit, the 5volt being the negative charge and GND being the positive charge.
About the Project
During this project we had a few packets that taught us how to code and build circuits. The first packet we got had us set up simple circuits and see how the electricity went through them. We started with a battery with a wire attached to both the positive and negative ends. If left like this however, it would short out the battery, draining its power extremely fast. So you would need to add something in between the wires like a bulb or resistor, something that makes it take longer to go around the loop. It also showed us that resistors affected the brightness of the bulb and how wires and bulbs by themselves could change the bulbs brightness depending on how it was set up. For example if two bulbs were in a parallel circuit to each other, then they would have the same brightness. We also put the bulbs in a series and then those series inside of parallels, basically to test our knowledge and see if we new what was going to happen when it was set up a certain way.
For the second packet of the project we got to work on a breadboard. Using a breadboard we could now build circuits in a small area, as before it took up a lot of space. Now that we knew how electricity went through a circuit, all we had to do now was make what we were originally building smaller. After that, we knew how the electricity when through a circuit and how to use a breadboard to condense the size of it.
The last packet the most tricky one of the three. This is when code came into play. For the packet we had to go into the code and write down what each section did so that we code later refer to it when we were working on our final project. It was not only code however, we also set up some more complex circuits and had the code make it do certain things. Like making lights light up in a pattern or have it play a song.
Reflection
This project was by far one of my favorites to do. We got to learn how to build circuits and how to code them to do certain things. I learned a lot about how coding works during this unit. I also learned a bit about how electricity flows. Even though the pictures you see of our project look like there are wires everywhere, it's fairly simple to track how it moves once you take a closer look at it.
Some things I would have liked to add to our project would be to make it play a sound when someone won. But that would have been difficult to do since we would have to test for three lights of the same color being on in a row, and then doing that for every row. We probably could have done it but we just didn't have enough time, even being the second ones to start the project in the class. Our project also had some bugs. Every once in awhile it would just stop adding more lights, it would just get rid of one previously selected. This happened every so often but in the end, I was happy with what Aiden and I had built.
Some things I would have liked to add to our project would be to make it play a sound when someone won. But that would have been difficult to do since we would have to test for three lights of the same color being on in a row, and then doing that for every row. We probably could have done it but we just didn't have enough time, even being the second ones to start the project in the class. Our project also had some bugs. Every once in awhile it would just stop adding more lights, it would just get rid of one previously selected. This happened every so often but in the end, I was happy with what Aiden and I had built.
